
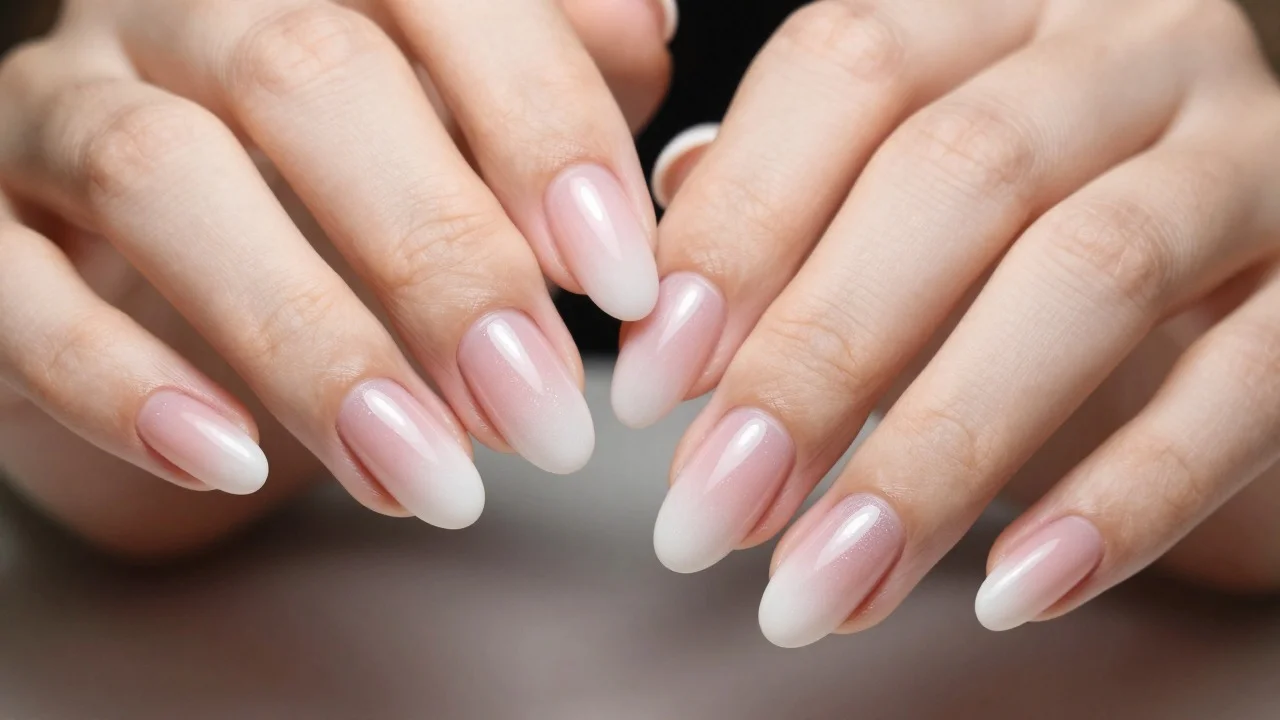
Ombre nails blend one colour into another without a hard dividing line. The result can be a soft French fade, a vivid colour transition, or a reflective chrome finish. Current 2026 nail coverage keeps returning to French gradients, pink blends, aura effects, jelly colour, chrome, and glitter.
Quick answer: An ombré manicure uses two or more shades that gradually blend across the nail. For a timeless look, choose pink fading into milky white. For something current, try berry, chrome, aura or jelly finishes. The technique works on short or long nails and with regular polish, gel, dip, or acrylic. For the full picture, read Summer Nails for Canada.
| What to choose | Good starting point |
| Most classic style | Sheer pink to milky white French fade |
| Easy everyday option | Nude, blush or soft pink gradient |
| Bolder 2026 direction | Aura, berry, chrome or jelly colour |
| Short-nail choice | Vertical nude, pink or pastel fade |
| Special-event finish | Pearl, chrome, fine glitter or glazed top coat |
| DIY-friendly method | Two polish colours and a cosmetic sponge |
Key Takeaways
- French fade remains one of the easiest gradient styles to wear year-round.
- Chrome, aura, jelly and berry finishes give the technique a more current feel.
- Short nails can carry a gradient as well as long almond or coffin shapes.
- Similar shades usually create the softest transition for beginners.
- Bring a reference photo to your nail appointment and specify the shape, finish,h and direction of the fade.
What Are Ombre Nails?
The word ombré describes a gradual shift from one colour or tone into another. On a manicure, the fade can run from cuticle to tip, side to side, or from the centre outward. French ombré is the best-known version. Instead of a crisp white French tip, a milky white shade melts into a nude or pink base. It is also called a French fade or baby-boomer manicure.
A gradient can also use brighter colour. Blue may move into lilac, burgundy into pink, or several pastel shades can meet without sharp lines.
For more Canadian trend and everyday-style reading, browse Lifevoria’s lifestyle guides.
21 Gradient Designs Worth Saving in 2026

Recent nail roundups show how far the look has moved beyond a simple pink-and-white fade. Aura effects, chrome overlays, jelly finishes and colourful French variations are all appearing in 2026 inspiration coverage.
- Classic French fade: Blend a sheer blush base into a soft white tip for a clean, understated manicure.
- Milky pink: Keep both colours translucent. The result feels softer than an opaque French style.
- Blush pink gradient: Move from pale pink near the cuticle to a richer rose at the tip.
- Berry fade: Mix raspberry, cranberry or wine tones for an easy late-summer or autumn look.
- Chocolate brown: Blend cream, latte, and deep brown tones for a neutral manicure with more depth.
- Icy blue: Fade pale blue into white or silver for a cool winter colour story.
- Lavender haze: Combine lilac with blush or milky white for a soft spring option.
- Peach-to-pink: Warm peach melting into pink gives a sunset effect without using neon shades.
- Coral sunset: Blend coral, orange and pink for a brighter summer manicure.
- Blue-to-purple: Use neighbouring cool shades for a colourful transition that still feels coordinated.
- Glitter fade: Concentrate fine glitter at the tip or cuticle, then reduce it toward the centre.
- Silver-dusted French: Add a light silver shimmer where the white and pink meet.
- Gold-on-nude: Fade fine gold glitter over a neutral base for an event-ready finish.
- Chrome gradient: Place chrome powder over part of the colour transition instead of covering the whole nail.
- Glazed fade: Add a pearly top layer over a pale gradient for a glossy, light-catching surface.
- Aura centre: Place the strongest colour in the middle and diffuse it toward the edges.
- Jelly gradient: Use translucent colour so the fade looks glossy and slightly see-through.
- Rainbow pastel: Blend two or three soft shades rather than using a different solid colour on every nail.
- Vertical fade: Blend from one side of the nail to the other. This works well when you want something less traditional.
- Reverse French fade: Keep the strongest colour near the cuticle and let it soften toward the tip.
- Accent gradient: Wear a solid manicure on most fingers and reserve the fade for one or two accent nails.
Planning several beauty appointments for an event? Lifevoria’s Canadian facial booking guide covers another part of the pre-event planning process.
Choose the Right Colour, Shape and Finish
The easiest way to narrow 21 ideas is to choose the mood first. Then select a nail shape and finish that support it.
| Style goal | Colour direction | Shape to consider | Finish |
| Clean and minimal | Nude, blush, white | Short oval or squoval | Sheer gloss |
| Romantic | Pink, white, lilac | Oval or almond | Pearl |
| Bold summer colour | Coral, orange, pink | Short almond or square | High gloss |
| Moody autumn look | Berry, burgundy, chocolate | Almond or squoval | Gloss or velvet |
| Winter-inspired | Icy blue, white, silver | Almond or short square | Chrome or pearl |
Short nails do not need tiny designs. A simple fade can make the full nail surface part of the design.
Longer almond and coffin shapes give a nail artist more space for several colours. They also suit detailed additions such as glitter, chrome, or tiny gems.
Can You Create the Look at Home?
A cosmetic sponge is one of the most common ways to make a two-colour gradient with regular polish. Professional tutorials also use brushes and gel-specific methods.
- Prepare the nail. File the shape and start with a clean, dry surface.
- Apply base coat. Let it dry before adding colour.
- Paint both colours onto a sponge. Place the shades beside each other with a small overlap.
- Press the sponge onto the nail. Use light dabbing motions rather than dragging it.
- Build thin layers. Repeat until the transition looks even.
- Finish with top coat. The glossy layer helps soften the appearance of the sponge texture.
Use liquid latex or carefully clean up around the nail if the sponge transfers colour onto your skin.
Gel requires the correct curing lamp and the curing instructions supplied with that particular product. Regular polish is simpler if you are trying the technique for the first time.
How Long Does the Finish Last?
Wear time depends more on the product system, preparation, and daily use than on the gradient itself. Published nail guides commonly place regular polish around a week, gel near two to three weeks, and acrylic or dip around several weeks before maintenance becomes noticeable.
| Product | Typical planning range | Main consideration |
| Regular polish | About 5–10 days | Chips sooner but removes easily |
| Gel polish | About 2–3 weeks | Requires correct curing and removal |
| Dip or acrylic | Often 2–4 weeks before maintenance | Growth becomes visible at the cuticle |
Wear gloves when using household cleaners and avoid using your nails as tools. Those habits can reduce unnecessary breakage.
Keep Your Natural Nails in Good Condition
A beautiful manicure should not depend on damaging the nail underneath it. The Canadian Dermatology Association notes that repeated water exposure, irritants, and allergens can affect nails and surrounding skin. It also identifies acrylates used with some acrylic and gel systems as potential allergens.
Do not peel gel, dip, or acrylic product from the nail plate. Follow the removal process for the system you are wearing.
Stop using a product if the surrounding skin develops a persistent reaction. Pain, significant swelling, nail separation, or signs of infection deserve professional medical attention.
If personal style planning also includes new jewellery, Lifevoria’s ear-piercing guide for Canada explains studio selection, healing and aftercare.
Your Next Manicure Plan
Save three reference images before you choose a design. Then decide on one colour story, one shape and one finish. Give your nail technician a specific brief instead of showing a large inspiration folder. For example: “Short almond, sheer pink base, milky white fade, glossy top coat and no glitter.”
That one sentence tells the artist where the colour should go, how the nail should be shaped,d and how you want the finished surface to look. It also leaves less room for a manicure that looks good but is not the one you pictured.
Frequently Asked Questions
They can be either. The effect can be created with regular polish, gel polish, dip powder, or acrylic. The word describes the colour transition rather than one product.
Regular polish often lasts around a week. Gel commonly lasts about two to three weeks. Dip and acrylic systems may remain wearable for several weeks, though natural nail growth can make maintenance necessary sooner.
French ombré blends a nude or pink base into white at the tip. Unlike a classic French manicure, there is no crisp line separating the two colours.
Pink and white are forgiving because the finished style is meant to look soft. Nude and blush are another simple pair. Two shades from the same colour family can also be easier to blend than high-contrast colours.
Yes. Keep the transition simple and avoid squeezing too many colours onto a small nail. A two-tone vertical or cuticle-to-tip fade can work especially well.